RD2/View Direct On-Line Reports
Setting up a shortcut on the desktop
1. Click on Start, Find, Files or Folders
2. Type "Host Explorer" in the "Named" field, and click on "Find Now."
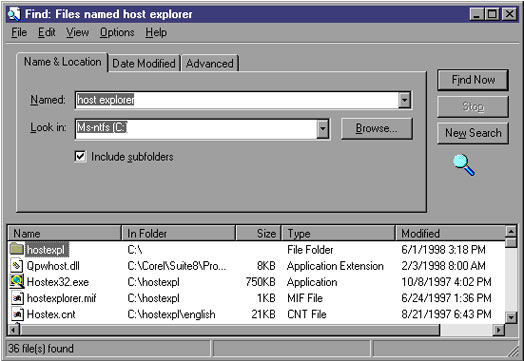
3. After the search has been performed, right-click on "HOSTEX32" This will bring up a dialog box with some choices, left click on "Create Shortcut."
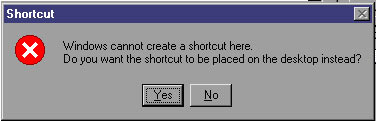
4. A dialog box will come up stating, "Windows cannot create a shortcut here. Do you want the shortcut to be placed on the desktop instead?" Click on Yes.
5 . You may click on the name of the shortcut and modify it to read "View Direct" if you wish, but this is optional
^ Back to top
Model 5 Session
The following steps are from the Windows NT Desktop with nothing yet started for the Host Explorer Version 6.0 (Hummingbird) software. Other 3270 Emulation software may have similar options.
- Click on Start, Programs, Host Explorer, 3270
- Expand the 3270 icon by clicking on the "+" next to it
- Highlight the Default icon by single-clicking on it
- Click in the Host window at the bottom of the dialog box and enter the mainframe's IP address: 170.104.128.11
- Click on the connect button at the top right
- Click on Options, Edit Session Profile
- Expand the Terminal icon by clicking on the "+" next to it
- Highlight the 3270 icon by single clicking on it
- Click on the Model 5 (27x132) option under 3270 Model
- Click OK at the top right
- Click File, Save Session Profile
- The name of your session will now appear in the Save Session Profiles window
- It should read Default. You may Click in this window and change the name if you wish, but it is optional.
^ Back to top
Sign-on to CICS
![]() Double click on the DHR icon. This will open to your Hummingbird Menu.
Double click on the DHR icon. This will open to your Hummingbird Menu.
1. At the Select Command, Type "G", then press "Enter"
2. Type "CESN", then press "Enter"
3. Type your USERID and Password, then press "Enter"
4. When sign-on is complete, clear the screen and type "RD2", then press "Enter"
^ Back to top
View Direct menu

^ Back to top
Login IDs
| Agency | Login ID | Password |
| Child Welfare | HC (followed by the 2-digit branch number) Example: HC24 |
(2-digit Branch number) Example: 24 |
| Child Welfare | HCM (followed by the 2-digit branch number) Example: HCM24 |
CW (followed by 2-digit branch number) Example: CW24 |
| Child Welfare | SCFSTAFF | CWSTAFF |
| Self Sufficiency | HWB (followed by the 4-digit cost center) Example: HWB2402 |
(4-digit cost center) Example: 2402 |
View by report or topic
This has been defaulted at "R" for Report.
Report/Topic
Enter all, or part of the Report number, e.g. WCM0930R-E or WCM. If entering the entire report number, with a "NO" in the Display List or Reports/Topics Field, you will go directly to this report. With the default of "YES" in the Display List of Reports/Topics Field, you can enter part of the report number and you will receive a list as close to that selection as possible. If you leave this field blank, with the default of YES in the DISPLAY field, you will bring up the entire list of reports available to your branch or section.
Version
If you know the date a report was run, you can enter the date in the first part of this field (YYMMDD). The second part of this field is for time, which would usually be left blank. Normally, you would leave both of these fields blank and the default of "YES" in the display list of Versions field.
Section
This field can be used if the report has been sectioned by branch, etc. For example, if the report has been sectioned by Branch number and Worker ID, you can enter your Branch number followed by your ID in this field and you will start at that section of the report. This option will probably not be used much. If the report has been sectioned, only your portion of the report will be available in your branch. The units that might be receiving the complete version of a report may use this.
Display list of reports/topics
The field is defaulted to "YES." This allows you to enter part or none of the Report number and receive a list of the reports available as close to the requested selection as possible. The report list is in alpha/numeric order. If there is a "NO" in this field, there must be a complete "Report" number entered above.
Display list of versions
The field is defaulted to "YES." This allows you to see the list of versions for the selected report by run date/time. If there is a "NO" in this field, you will not see this list and will be taken to the most recent version of the report.
Display section index
This field is defaulted to "NO." If however, you are viewing a complete report that has been sectioned, you can enter a "YES" in this field and receive a list of the sections of this report. For example, if a report has been sectioned by branch number and worker ID, this list will show each Branch and ID. Then you can select which of these you would like to view.
^ Back to top
Most common method of retrieving reports
Remember, it is assumed you have already entered the system and entered your Recipient ID and Password. Also, always leave the "R" in VIEW BY REPORT OR TOPIC field. Move from one field to another by using the TAB or Next Line Key (usually the "Enter" key).
Leave Report/Topic ID blank. Hit "ENTER." All reports available to your agency will be listed. Once you are viewing the list of reports, an "L" for Locate in the COMMAND field, followed by the beginning letters of the report will allow you to jump through this list to find the report you are searching for. You can also use F7 & F8 to page back and forth through this list. When you find the report you are interested in, select it (any character in the OPTION field) and Enter. This will display the report.
| Option 1: | Type all or part of the Report number in the REPORT/TOPIC ID Field, otherwise leave this blank. If you leave the defaults set and type part of the Report number, you will receive a list of reports starting as close to the selection you requested, thereby limiting your search. If nothing is entered in this field, and the defaults are left set, you will receive the entire list of reports for your branch or unit. |
| Option 2: | If you enter the entire Report number, set the "Display List of Reports/Topics" and "Display List of Versions" fields to "NO," you will go directly into the most recent version of this report. |
^ Back to top
Printing
Access the printing menu by pressing F2 or typing "PR" on the command line. You will need to know your 4-digit printer ID (e.g., HPYK) for this screen.
If you have marked pages, the Print Menu displays ". . . ." for the section and number of pages to be printed. A message in the upper left corner indicates the number of marked requests. Tab to the Online Printer ID and type in the 4-digit printer ID where you'd like the print to be sent. Hit Enter, to make the request, hit Enter a second time to send the request to the printer.

If you do not have marked pages for printing, specify the pages from and pages to section and type in the number of pages to be printed. Tab down to Online Printer ID and type the 4-digit printer ID where you'd like your printouts to be sent. Hit Enter to make the request, hit Enter a second time to send the request to the printer.
^ Back to top
Function Key Commands

^ Back to top
Who to call...
Printer Problems: Call the SERVICEDESK at (503) 945-5623.
Display Problems: If display seems to wrap around or characters are scattered on the screen, check and make sure you are using a Model 5 session, if you are still experiencing problems call SERVICEDESK at (503) 945-5623.
Report Problems: Call the SERVICEDESK with the report number and description of the problem.
^ Back to top