II. RACF
10/20/2016
A. Oregon
ACCESS sub- administrator procedures
The goal when
assigning rights is to assign them minimally. Give the user enough rights to do
their job but do not assign rights that are not needed.
The rights tree can be
seen from the Rights tab and is the
pane on the left side of the screen. The Rights tab is accessible by going to the Select menu> Housekeeping> Maintain Security Profile.
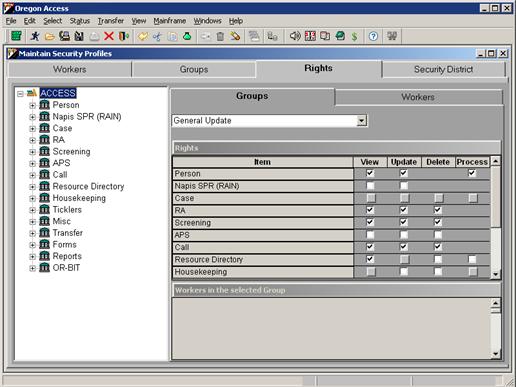
There are four basic
types of rights that can be assigned:
1.
View – users may view the windows contents.
2.
Update – users may update the data displayed in the window. They can
also add or insert new records.
3.
Delete – users may delete the displayed data in the window.
4.
Process – users may perform behind the scenes processing, such as
delete a case, approve hours or activate and inactivate a case.
In the above window:
· A solid square indicates there are some but not all rights assigned to the group at a lower level;
· A blank or empty check box means no sub tree items are selected;
· A checked box indicates all rights are assigned to the group.
Example: If a user is given General Update they do not
need to be assigned General Read because if they are able to update data in a window,
they are also able to view it. This applies to many rights available in Oregon
ACCESS (OA). There are many cases where Read right or an Update right may be
assigned.
2.
Accessing the Worker tab of the Maintain
Security Profile screen
1.
Sign on to Oregon
ACCESS (OA) using your OA/RACF ID login and password.
2.
Go to the Select menu.
3.
From the drop down
menu, select Housekeeping.

4. From the drop down menu, select Maintain Security Profile.
5.
The Workers tab will be active in the Maintain Security Profile section.
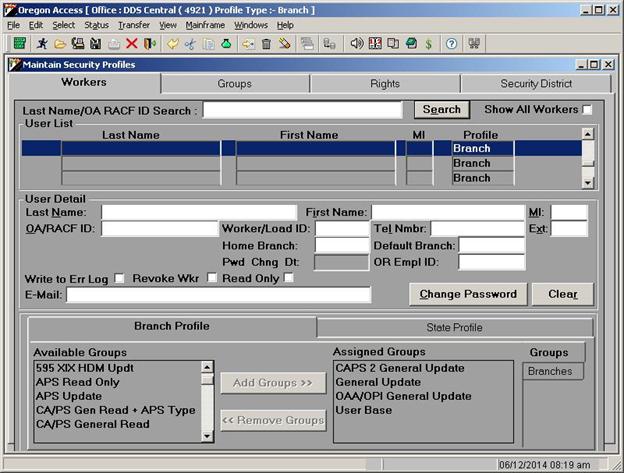
3.
Adding and maintaining worker/user information
and access
The Worker tab has three components;
-
The user search
section provides the ability to search for an existing worker;
-
The user detail
section allows the entry or update of user information; and
-
The user profile
section allows you to authorize access or rights.
Last Name/OA RACF ID Search
Enter the last name or
the Oregon ACCESS (OA) RACF ID of the new employee or the employee to be modified
in the Last Name/OA RACF ID search
field and click on the Search button.
If unsure of the exact spelling of the last name, enter part of the name. When
the search button is clicked, it will place the sub-administrator in the user
list; use the scroll bar to find the name.
Note: Always do a last name/OA RACF ID search prior
to adding any new employee. If the employee is located during the search,
modify that record rather than adding a new one.
User Detail - After last name search is complete if no record was found
click on the Add a New Worker icon in
the menu bar. The user detail field will display a blank screen.
1.
Enter the last name of
the new user, as it should appear on the Oregon ACCESS forms. Lower case and
capital letters are allowed.
2.
Tab to First Name and enter the first name as
they want it printed on the Oregon ACCESS forms.
3.
The Write to Err Log should be blank.
4.
Tab to MI and enter the middle initial.
5.
Tab to Worker/Load ID and enter the load code
ID.
6.
Tab to Tel Nmbrand
enter the telephone number to be printed on forms.
7.
Tab to Ext and enter the person’s telephone
extension number.
8.
Tab to OA/RACF ID; this is the user’s RACF ID. The
person will use this to log into Oregon ACCESS. This field will only accept
lower case letters. The RACF allows users with mainframe integration authority
to integrate with the mainframe.
Note: Remember
the password must never be shared or posted anywhere. The initial default
password is the word access. It must be changed after they log in the first
time.
9.
Tab to Home Branch field and select the branch
where the worker is located. Usually, the home branch will correspond to the
local Oregon ACCESS office.
10.
Tab to Default Branch field, this can be left
blank and the worker can select the branch they would like the system to log
them into.
Establish user profile - The user profile section of the Worker tab has two parts; a branch profile and a state profile.
The branch profile part has two tabs, Branches and Groups.
Branch Profile tab - The Branch
Profile tab will be active. This tab has two functions; to designate the
branches or offices the user can access, and to designate the level or groups the
user can access.
For the branches
portion, click on the branches or districts in the Available Branches/Districts box the person should belong to and
click on the Add button. The person
will now show in the Assigned
Branches/Districts box. If a district was picked, all the branches within
that district will be assigned at the same time.
For the groups portion, click on the Groups the person should belong to and click on the Add button. This will give the user
rights to the screens and tabs in the assigned groups.
State Profile tab - Click
on the State Profile tab and select the groups the person should
belong to and click on the Add button.
This will give the user statewide rights to the screens and tabs in the
assigned groups.
Note: The
other tabs in the Maintain Security Profile are view only for
sub-administrators. Contact the APD Chief Data Steward if you have questions.
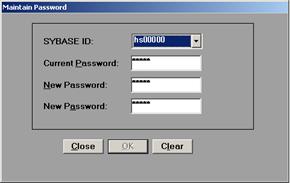
Resetting the user password
1.
Sign on to OA using
your OA/RACF ID login and password.
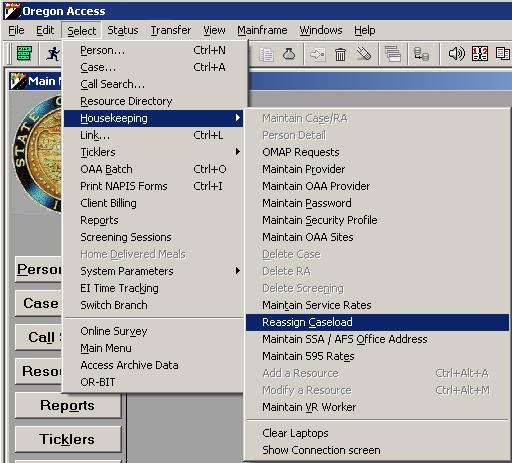
2.
Go to the Select menu.
3.
From the drop down
menu, select Housekeeping.
4.
From the drop down
menu, select Maintain Password.
5.
Type the user’s
OA/RACF ID in the SYBASE ID field,
type YOUR password in the Current
Password field, and enter a new default password (usually the person’s
OA/RACF ID) in the New Password fields and click the OK button.
6.
Give the user the
default password. The user should login immediately and change the password to
a new one of their choosing. Remind them to change their mainframe password to
match.
To reassign an entire
caseload from one worker to another:
1.
Sign on to Oregon ACCESS (OA)
using your OA/RACF ID login and password.
2.
Go to the Select menu.
3.
From the drop down
menu, select Housekeeping.
4.
From the drop down
menu, select Reassign Caseload.
The following Reassign Caseload screen will appear. It is divided into three
different tabs: Case, RA, and Screening. A worker may have cases listed on each
tab so be sure to check each tab when reassigning a caseload.
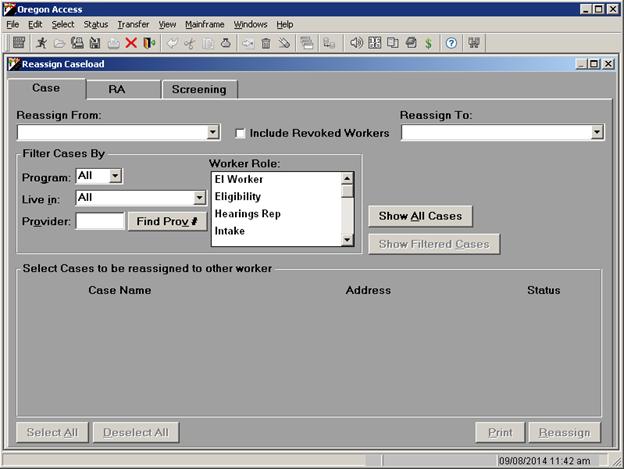
5.
Select the originating
worker’s name from the Reassign From drop down box.
6.
Select the destination
worker’s name from the Reassign To drop down box.
7.
Click on the Show All Cases button.
8. Select the records to reassign.
- To reassign all of the cases, click on the Select All button in the lower left corner of the screen.
9.
Once all records have
been chosen, click the Reassign button in the lower right corner of the screen. Depending on how many records are
moved this can take some time. OA will respond when finished with the total number
of records reassigned.
The worker table exists on the
mainframe to hold the names of the workers, usually case managers, whose names
print on vouchers. The worker table can only be edited by the Chief Data
Steward at Central Office. Requests should be sent to the apd.security-requests@state.or.us mailbox.
The information needed to create an
entry in the worker table is:
-
Branch name;
-
Branch number;
-
Name of worker;
-
Position title; and
-
Load code.
Without a load code entry in this
table which matches the load code entered at the time the voucher is issued, the
process of creating the voucher will fail.
If
the voucher prints with an incorrect name corresponding to the load code
entered, the worker table needs to be updated.
C.
Oregon
ACCESS RACF guidelines
1.
Customer confidentiality and data security
As a condition of receiving computer information,
for example using DHS mainframe systems or Oregon ACCESS (OA), staff is
required to read the Data Security Requirements form. Users are responsible for
information entered and payments issued using their system access ID and
password. It is the responsibility of all authorized users to protect confidential
customer data in all forms including electronic, written documents, reports,
and verbal. This protection includes maintaining password secrecy, not sharing
terminal access with others, and taking a pro-active approach in the protection
of customer data and confidentiality.
Data security requirements
DHS is responsible for securing the information
provided to us by customers and partner agencies. To do this DHS uses Resource
Access Control Facility (RACF), which is IBM’s security software program, and the OA security program for Oregon ACCESS.
These programs protect against unauthorized use,
modification, or loss of sensitive or critical data by restricting availability
to authorized users.
-
Protect data by
granting or denying access to transactions using a unique identifier and
password for each user.
-
Provide accountability
by enabling the department to know who issues payments, and support fraud
detection.
-
Ensure unauthorized persons
cannot access, view, receive or alter information protected by RACF or OA.
Passwords are the primary security measure preventing unauthorized access to DHS confidential information or changes to our
data. Passwords are the personal responsibility of each employee.
Passwords are an important part of the protection
between the outside world (Internet) and our customers’ data. Password
protection is vital to data security and must not be taken lightly. Staff
should never be asked for a password by another person.
When a mainframe RACF user ID is assigned, the
password will be a default password. In most instances, the default password
will be identical to the RACF user ID. The first time staff enters CESN, RACF
will ask for the user ID and password. When entered, RACF will ask for a new
password.
When setting up in Oregon ACCESS (OA), the user ID will be the RACF user ID and the default password will be access. The first time staff enters OA, they will be required to enter a personal user ID and a new password.
No process in the
mainframe systems or OA requires staff to give their passwords to someone else.
If there is a password problem, the security administrators should only assist
by resetting the password to a default password to allow selection of a new
confidential password.
NOTE: The
Oregon ACCESS password and Mainframe password must match. If they do not match,
staff will receive an error message when trying to do any Oregon ACCESS action
that communicates with the mainframe (for example a person search or CMS
Integration).
RACF and Oregon ACCESS require a new password
every sixty days. Additionally passwords must be changed whenever password
secrecy may have been compromised. After five attempts to use an invalid
password on the mainframe, or if it is forgotten, staff must request reinstatement
through the local sub-administrator or the Service Desk, if the sub-administrator
is unavailable.
Procedures for maintaining passwords
CESN (RACF) sign-on and sign-off procedure
To sign on after receiving a user ID and default
(temporary) password, staff may access the CICS system using the following CESN
sign on procedure:
1.
Request access to CICS
by entering a G (General Production)
or W (Training) on the menu screen. G is used by most staff.
2.
Clear the screen and
type CESN and press the {ENTER} key.
The password screen appears, asking for Userid,
Password, Language, and New Password.
3.
Logon in one of the
following ways:
a.
First time log on: Type in the assigned Userid and default Password and press the {ENTER} key.
({TAB} between the Userid and Password.) The first
time a user signs on with CESN, the default password will be the same as the Userid. Ignore the Language field as it is not currently
used. After entering the Userid and Default Password,
the cursor moves to the New Password line and prompts for a New Password. An
individual secret password must be typed in by the staff person. Press {ENTER}
to access CESN.
b.
To change a password: Type in the assigned Userid and Password, {TAB} to the New Password field, enter
a new password, and press {ENTER}. You will receive a message the following
message: signon is complete.
c.
Normal logon: Type in the assigned Userid and default Password and press the {ENTER} key. ({TAB}
between the Userid and Password.)
4.
Press the Pause/Break key to clear the Sign on Complete message from the
screen.
To sign off
At a cleared screen, type O or OFF and press
{ENTER} to exit and return to the main menu.
Note:
Do not leave your terminal/PC unattended when it is logged into the DHS system.
Log off when you leave for breaks, lunch, meetings, etc.
Oregon ACCESS sign-on and sign-off procedure
To sign on after receiving a Userid and default (temporary) password, staff may access Oregon ACCESS (OA) using the
following sign on procedure:
1.
Double click on the
Oregon ACCESS icon.
2.
Enter your Oregon
ACCESS user ID (RACF ID). The user ID field will always auto fill with the last
user ID used.
3.
Enter your password.
When you are set up in Oregon ACCESS your default password will be access and
you will need to change it to match your mainframe password.
4.
Click on the OK
button.
The RACF manual is located here.