XV. Miscellaneous
01/22/2019
Forms are ordered from the DHS|OHA
Forms Distribution in Salem via DHR or mainframe using the
Field Branch Ordering System (FBOS). The FBOS ordering and inventory system for printed forms is used by
all DHS,
OHA, and AAA offices. Designated staff in each office are allowed to order
forms and brochures as needed.
- Note: Care should be taken to not over order or stock
materials because many forms and brochures change frequently.
The FBOS order system consists of three
screens: FBOS, FREQ, and FBLD. The FBOS screens allow ordering of forms and
show the order history for the branch to eliminate duplicate orders as it shows
all backorders first.
- FBOS F4: Review an open order;
- FREQ F5: Place a new order;
o
- FBLD F6: View only screen with information on availability of DHS forms, minimum or maximum order, and the amount available.
o
o
Up to seven items may be ordered
at one time.
o
Note: To locate a form without the
exact number, enter any number and page up or down until the form is located.
If the form cannot be found, it may not be available for order. To check for
available forms click here and it
will take open the DHS|OHA Publication and Forms Server. The bottom of webpage
will explain how to search for materials.
See APD Worker Guide A.2 for
information on translations and alternate formats.
- Note: OHP application packets are ordered using the DHS 0010.
To order forms:
- Login
to GCICS;
- Type CESN <Enter>;
- Enter
the RACF ID and password;
- Type FBOS;
- The
history of orders placed by the office associated with the RACF ID entered
will appear in the following order
o
Backordered forms are listed
first;
o
Inactive forms are listed second;
o
Current orders are listed last;
·
Press F5 to reach the FREQ order screen;
·
Enter form prefixes (DHS, MSC, SDS),
form numbers, form suffixes (optional), and quantities for forms to be ordered;
o
Note: The form number is always 4 digits.
Use leading zeroes for form numbers less than 4 digits, such as the SDS 0539A.
Orders must be placed for the
minimum quantity or in multiples of 25 (100, 125, 150, and 250). An order of
one (1) will receive one (1) publication or form not one (1) bundle.
·
Enter up to seven (7) forms on the FREQ screen;
·
Press <Enter>;
·
Titles of the requested forms will
show on the screen and a message will appear asking if this order is correct.
If the order is correct, enter I and
press <Enter>;
·
The message, Forms Order Successfully Processed will appear at the bottom of the
screen;
o
If there is a problem with the
order, an error message will appear at the bottom of the screen and the cursor
will jump to the problem;
o
Correct the error in the order if
needed and press <Enter>;
o
Continue to correct the order
until a message asking if this is the order to place (described above) appears;
·
If the message Form Number is Inactive appears on the bottom of the screen, review
the message under the title of the form for the reason the form is inactive.
o
If the form has been renumbered,
instructions about how to order the form will appear here;
·
The message Form Number Not Found means the form is not stored at Distribution
Center and cannot be ordered on FBOS.
FBOS
screens explained
Orders already placed by the branch
are arranged in four groups on the FBOS screen.
- Backorders -Backorder the date the form was backordered appear under the form number. These are placed orders for which there are no forms available to ship. The backorders remain in place until a shipment is received and entered on FBOS. When the form is restocked, the backorder is converted to an order automatically by the FBOS system. Additional orders placed for a form which is already on backorder will generate an additional leading to over ordering and shipping.
- Note: Backorders remain on the system until there are a sufficient number of forms in the system to cover the order then they are automatically filled. Do not reorder a backordered form unless the office needs more forms than the total already ordered.
- Inactive forms - Inactive and the date the form
was inactivated appear under the form number. An explanation will appear
in the line under the form name:
- Obsolete: The form is obsolete and will no longer be printed or made available. The date the form was obsoleted appears;
- Distribution in process or Distribution and the date: DHS Publications revised the form and old stock must be recycled. This prevents offices from ordering the form until new forms are received which is usually a one (1) month supply in the distribution. This status also eliminates backorders for that form;
-
Inactive and Ship Later:
Status appears if the form is translated but is not kept in stock because
the volume used is too small to warrant pro-printing. For a more
detailed explanation of this process, see Section 5 below.
- Obsolete: The form is obsolete and will no longer be printed or made available. The date the form was obsoleted appears;
- Current day orders - Orders placed today show Ordered on and today's date. This order is held by the computer until
the end of the day, about 6:30 p.m., at which time all orders are batched
and printed. The status of this order then changes to a pending order.
- Est Ship By - Located directly below the form number is
the Est Ship By date which is
automatically entered by the computer. The estimated date is eight (8)
days from the date the order is entered. These orders remain on the system
for twelve (12) days after the estimated date.
Odd quantities on FBOS. An order for one (1) less than the quantity shipped is a
convention which tells DHS Publications to ignore the order and indicates the
forms have already shipped.
The FBOS Accounting System is both
an order system for branches and an inventory control system. The system must
know what the actual inventory is to generate an order when the forms are
available or a backorder when there are not enough forms to fill the order.
Whenever a form leaves the inventory, it must be deducted from the system.
Periodically a branch may run out of
a form they need immediately and cannot to wait for the order to be processed
and shipped. A procedure has been developed to handle the occasional occurrence
of this.
The branch should call DHS
Publications, 503-373-7120, and request the forms ships immediately. This is to
ensure the branch knows the form will be shipped and means the branch can be
informed if distribution services are unable to ship the form.
The branch should speak directly to a publications staff person for urgent needs. Click here to access the Publications and Design Section contact list. Try calling the front desk first then the distribution second.
3.
Ordering
translated forms on FBOS
- See APD WG A.2 for
more information on translated forms.
The translated order system requires
a change in the form suffix. The form number and prefix remain the same. The
first letter is retained, but the next two letters indicate the language.
The 2-letter designation for each
language is two letters in the name of that language:
- Spanish - SP
- Russian - RU
- Vietnamese - VI
- Romanian - RO
- Hmong-HM
- Cambodian - CA
- Laotian - LA
- Mien - MI
APD forms are printed in Spanish,
Russian, and Vietnamese as a standard practice. Most forms translated into
other languages are not printed until after an order is received, unless the
need for another language has been clear in the past.
Orders for other language forms are
combined and printed every two (2) weeks. If an order is placed at the
beginning of the two-week period, it will take about four (4) weeks to receive
the forms. FBOS will show the forms on backorder while waiting until forms are
shipped. This allows the branch to know what is on order and prevent over
ordering.
Non-stocked forms can be identified
by the words ship later on the second
line of the form title. Local offices may receive orders for English
language forms which will include ship
later translated forms in the same order; these forms
will be shipped separately at a later date.
Orders for the pre-printed or stocked forms in translation will be shipped with the regular order. Pre-printed forms are identified by a symbol, either an asterisk or ampersand, in front of the form title. The two symbols indicate where the form is stored in the Distribution Center.
For questions, call the DHS|OHA
Distribution Center, at (503) 373-7120.
For
more information on how to order a publication in other formats or languages,
please visit the Publications and Design Section Project Request page by clicking
here.
B.
Medical transportation services program
All information of medical
transportation is on the Oregon Health Authority webpage.
Medical identification cards, or
medical IDs, are generated by the MMIS system when a consumer becomes eligible
for Medicaid or CHIP benefits. Medical cards are printed and mailed through the
DAS Distribution Services in Salem.
A replacement medical card may be
printed from the MMIS system using the following steps outlined in the MMIS
cheat sheet.
Tips: When talking with the consumer
about the medical card:
· A yellow envelope
from the State will contain information about the Medicaid benefits for
which the consumer qualifies.
- Inside the yellow envelope is a white piece of paper with a bunch of Xs on it.
-
On the top left-hand corner of the paper with the Xs, is the consumer’s Medicaid card.
- Recipients will need to show the card to medical providers to verify coverage. Possession of a medical card does not guarantee coverage.
D.
Requests for audit or review files
Files requested for a review or an
audit must be processed and sent to the requestor by the timeframe specified in
the request. Cases not received by the date on the email request will be
considered missing and cited as in error.
- Requestors will have already checked EDMS for the material needed and will only send requests when the information is not available on EDMS.
If there are any questions about
what is needed for the audit or review, contact the requestor immediately to
prevent late files.
When time allows, scan materials related to the request into EDMS; see Case file for instructions. Notify the requestor when the EDMS scan is complete.
- NOTE: Please pay close attention to the DATES and/or time frames requested to
prevent delays and rework.
Should a
reviewer need any material in a paper archive file, complete a DHS 6628, DHS Record Archives Document Request Form and send to the email
address on the form.
- In the Shipping
person and address box, please send the archive file to the
person/office making the request.
1. Recalling an Outlook message
When an email is sent in error, sent to the wrong person or group, or incorrectly sent to all staff, the sender has the option to recall the message. Recalled messages and will disappear out of the recipient’s inbox in Microsoft Outlook. Please follow these steps:
1. DO NOT send another email apologizing for sending the email by accident;
2. Go into the sent items folder and find the email to recall;
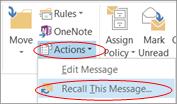
3. Open the email to recalled, locate the More Move Actions button and click Recall this message;
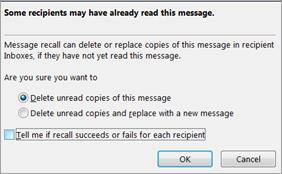
4. Choose Delete unread copies of this message; consider unchecking the box which says Tell me if recall succeeds of fails for each recipient to avoid multiple notifications.
2. Adding or changing phone numbers in Outlook
Staff members can add a mobile telephone number or modify their existing telephone number in Microsoft Outlook via the Outlook Web Access (OWA).
- Sign into OWA with your current User Name (OR#) and Password: https://mail.dhs.oregon.gov;
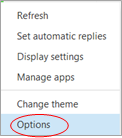
- Click on the gear symbol in the upper right-hand corner
 then choose Options;
- On the Options page, scroll down and click on Edit information… at the bottom of the page;
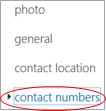
- On the left side menu, choose contact numbers to update or add a telephone number;
- Type your changes in the appropriate fields;
6. Save the changes before leaving page.
3. Creating a contact from a received email
Email received from senders outside of the DHS email network may be used to create a new contact in Outlook without retyping.
1. Right click on the person’s name as it appears in the email you received to open a window;
2. Click on Add to Outlook Contacts;
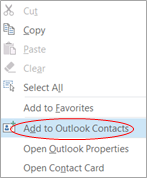
3. Fill in any additional information not already captured in open the contact information dialog box;
4. Click Save & Close in the upper right corner.
4. Ignoring all email in a conversation
When included in an email conversation or email thread, erroneously which causes a chain of email, instead of adding to the chain by requesting removal the best practice is to ignore the conversation.
To ignore:
- Click any message in the conversation to be ignores;
- On the Home tab, in the Delete group, click Ignore;
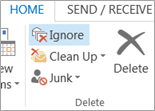
- Click Ignore Conversation.
Note: If the Don’t show this message again check box in the Ignore Conversation dialog box was previously selected, step 3 will not appear.
To stop ignoring a conversation:
- In the Deleted Items folder, click the conversation to be recovered, or any message within that conversation;
- On the Home tab, in the Delete group, click Ignore again (see above);
- Click Stop Ignoring Conversation.
The conversation will move back to the Inbox along with any future messages. Only messages still appearing in the Deleted Items folder may be recovered.
Note: If the Don’t show this message again check box in the Stop Ignoring Conversation dialog box was previously selected, step 3 will not appear.
5. How to Use Directory Update to enter your manager’s name
Use the Directory Update application to enter the name of your manager into your directory profile information.
Step 1 – Open Directory Update
· Open the Internet Explorer web browser. It is important that you do this in Internet Explorer, not any other browser.
· Go to http://DirectoryUpdate to open the DHS/OHA Directory Update Log In page;
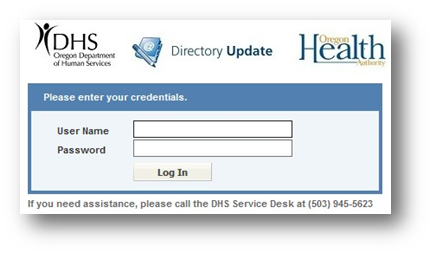
· Enter this information in the Credentials fields:
o User Name – OR (or P) number;
o Password – same as the one used on your agency-issued computer or laptop;
· Click Log In.
Step 2 – Examine your directory information
· The current DHS/OHA Directory information page will open;
o Use the Help button, top right, for questions;
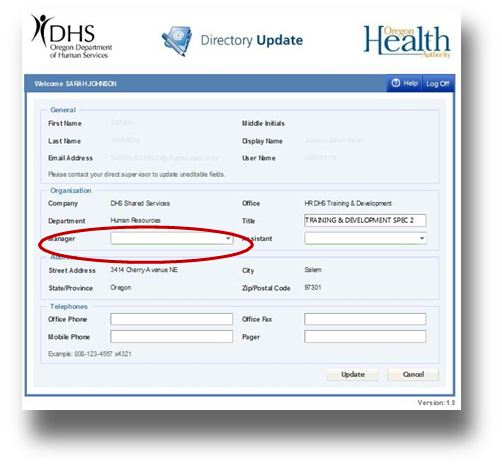
· Check to make sure the information is correct, and take appropriate action to correct:
o Most fields on the form are locked and cannot be changed – such as name, email address, user name (OR or P number), etc. These are greyed out.
o To update/change information in these fields, submit a DHS/OHA Personnel Action Request form (MSC 0109).
Enter or correct information in the white or blank information fields.
Note: The DHS/OHA staff directory is state property. As such, staff are responsible to enter only truthful and accurate personal information, and ensure that the directory is used only for its intended purpose.
Step 3 – Enter current manager’s name
· Click in the Manager field (lower left corner);
· Enter your manager’s LAST NAME first followed by FIRST NAME;
o A list of similar/same names will auto-populate a drop-down window;
§ Choose the correct name;
§ Make sure the correct name is shown in the field;
o Click on Cancel (lower right) to start over if needed;
· The Assistant field may be completed, but it is not required;
· When complete, click on Update in the lower right corner.
Step 4 – Close Directory Update
· If done correctly, a text box stating will open stating You have successfully updated your information;
o Click on Log Off in the lower right corner;
· Close the DHS/OHA Directory Update application.
Questions?
Non-Technical – Contact Records Department, DHS and OHA Office of Human Resources:
Using Directory Update – Contact the OIS Service Desk:
503-945-5623 or dhs.servicedesk@state.or.us. The Service Desk is available Monday through Friday from 6:00 a.m. to 6:00 p.m.
F. Guide of useful LGBTQIA+ terminology
G. Service Desk requests via website
Instead of waiting on hold to contact the DHS Service Desk, staff can send a request for assistance via their website. The website allows staff to explain the help they need and enter the assistance queue without waiting on the phone during busy call times.
DHS staff have a link to the website on their desk tops or it can be accessed directly.
Locating the shortcut. To use the DHS Service Desk request on a DHS desktop:
-
Locate the DHSOHA Shortcuts folder;
- Choose the Service Desk Portal option;
- A page will open with CA Service Desk Manager in the top left corner; this is the DHS Service Desk Website.
DHS Service Desk web address. The website address can be use by both DHS and AAA staff:
https://servicedesk.dhsoha.state.or.us/CAisd/pdmweb.exe.
A page will open with CA Service Dessk Manager in the top left corner; this is the DHS Service Desk website.
Using the website to make a request. After the site opens, add a Service Desk request by clicking File > New Incident. When the form open, work through the boxes and provide as much information as possible.
Boxes with a symbol in the corner, either a magnifying glass or a plus sign (+), will provide additional information when the symbol is clicked. be as accurate as possible.
When the form is complete, click on Save in the upper right.